
A Complete Guide on Installing Google Tag Manager on Your Shopify Store Theme Files
Google Tag Manager (GTM) is a vital tool in your e-commerce toolbox in an era where data-driven decisions are critical to the success of your Shopify business. It enables you to manage and deploy marketing tags (code snippets or tracking pixels) on your website without needing to edit the code. This post focuses on integrating GTM into your Shopify store's theme files, which is the option that most Shopify business owners need and choose. The following step-by-step instruction will walk you through the process, putting you on the road to better data-driven decision-making.
Step 1: Copy your GTM code
You already have a Google Tag Manager container set up for your Shopify site. You will now require the necessary GTM code snippets. Here's how they appear:

You'll find your unique GTM code (replace 'GTM-XXXX' with your actual ID) in your GTM dashboard.
Step 2: Log in to your Shopify admin panel
Access your Shopify admin panel. Enter the URL of your shop followed by '/admin' (for example, www.yourstore.com/admin).
Step 3: Edit your Theme Code
From your Shopify admin, go to Online Store > Themes. Click on the Actions button for the theme you wish to edit, then on edit code:

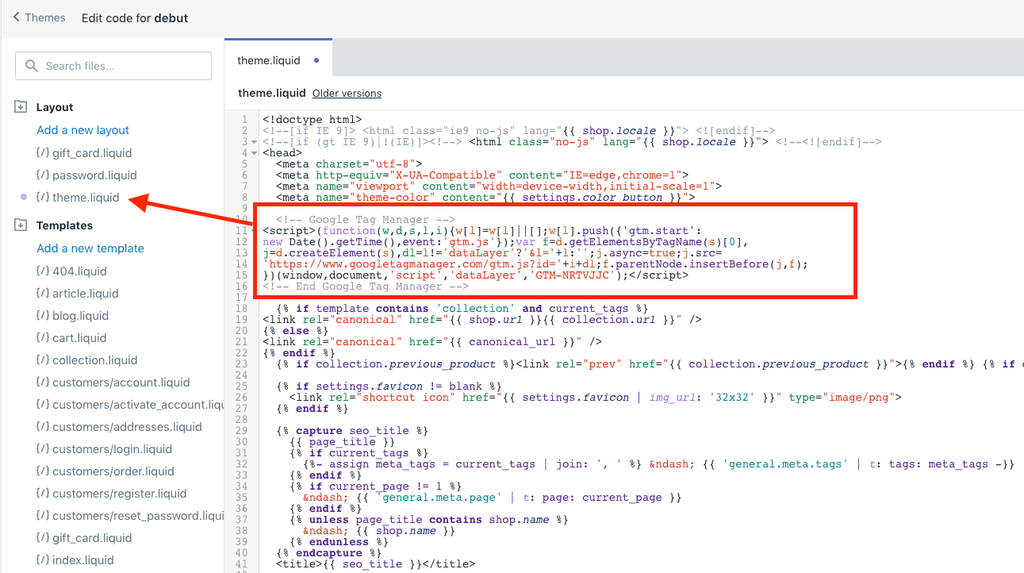
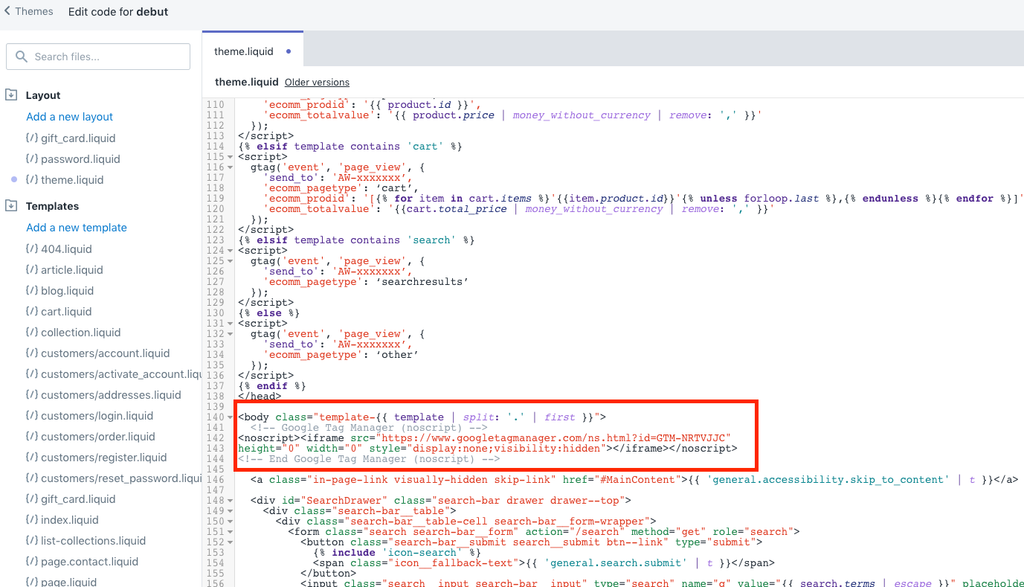
Step 4: Add the GTM code to the theme.liquid file
IMPORTANT: remember that changing the code of your theme can have an effect on the layout or functioning of your store. Before making modifications, we recommend duplicating your theme.
Locate the theme.liquid file in the Layout directory. This is where the Google Tag Manager codes will be placed.
The first section of the GTM code should be positioned as near to the opening of the <head> tag as possible. This is what it should look like:
Step 5: Save Your Changes
Once you've added the code snippets, click Save to apply the changes.
Step 6: Verify Google Tag Manager Installation
To ensure proper installation, use the Google Tag Assistant Chrome Extension. If everything is in order, Google Tag Manager will appear in the Tag Assistant interface.
We hope this post has helped you understand how to install Google Tag Manager to your Shopify store's theme files. However, there is a more difficult approach for precisely adding GTM to your checkout pages, and unfortunately, not many e-commerce managers use it. Although it requires more to consider, it can provide additional insights and data to aid in the optimization of your checkout process. Remember that data-driven decisions can dramatically boost the success of your Shopify store. Stay tuned to our blog for more advanced tutorials.